prettyprint

2017年4月20日 星期四

iOS 框架 Framework


iOS 可以分類為 4 個層別 Layer。即:Cocoa Touch,Media 媒體,Core Service 核心服務,以及 Core OS 核心作業系統。[1]

Cocoa Touch 提供使用者控制介面基本物件,例如:按鈕 Button,標籤 Label 等。( UIKit,MapKit,GameKit,MessageUI / AddressBookUI / EventKitUI, Twitter,iAd)

Media 層負責圖像,影音播放,3D 圖像生成等。(AVFoundation ,CoreAudio,CoreImage,CoreGraphics,CoreText,ImageI/O,MediaPlayer,OpenGL ES,QuartzCore)


Core Services 層用來存取較低階的作業系統服務,例如檔案存取,網路,以及許多資料物件類型,我們可透過基礎套件 Foundation 來定義自根類別 NSObject 的所有物件。基礎套件也定義了建立,管理,以及在記憶體中釋放物件的協定 Protocol。(Accounts, AddressBook, CFNetwork, CoreData, CoreFoundation, Foundation, EventKit, CoreLocation, CoreMotion, QuickLook, StoreKit,System Configuration )

Core OS 層包含執行緒,複雜的數學,硬體配件及密碼學等。(Accelerate, ExtterAccessory,Security,System)

框架 Framework 是個工具箱 Tool Box,此工具箱由各種類別程式庫 Class Library 組成,作為開發 App 的基本套件。

 Advanced Study 

1. Cocoa 基礎指南:
2.  iOS 人機界面指南


 Reference 


1. https://developer.apple.com/library/content/documentation/MacOSX/Conceptual/OSX_Technology_Overview/CoreServicesLayer/CoreServicesLayer.html

2. Cocoa Layered Architecture for Mac OS, http://www.knowstack.com/cocoa-layered-architecture-for-mac-osx/

/end

2017年3月24日 星期五

練習 3:自訂 Table View

1. 新建 Single View Application,之後 delete 此 default 之 UIViewController 與 ViewController.swift 檔案

2. 在 project 的資料夾,新建 New File > Cocoa Touch Class

3. 將此新增 class 與 UI 整合:指定此UI的TableView 的 class 名稱為 WordsTableViewController


4. 指定此為 First Initial Response

5.  將 TableView 的 Style = Basic, Cell Identifier = Cell

6.  修改 code

//
//  WordsTableViewController.swift
//  MyWords
//
//  Created by Elvis Meng on 2017/3/24.
//  Copyright © 2017 Elvis Meng. All rights reserved.
//

import UIKit

class WordsTableViewController: UITableViewController {
    
    var objNames = ["obj1","obj2","obj3","obj4","obj5","obj6","obj7","obj8","obj9","obj10","obj11","obj12","obj13","obj14","obj15","obj16","obj17","obj18","obj19","obj20"]

    override func viewDidLoad() {
        super.viewDidLoad()

        // Uncomment the following line to preserve selection between presentations
        // self.clearsSelectionOnViewWillAppear = false

        // Uncomment the following line to display an Edit button in the navigation bar for this view controller.
        // self.navigationItem.rightBarButtonItem = self.editButtonItem()
    }

    override func didReceiveMemoryWarning() {
        super.didReceiveMemoryWarning()
        // Dispose of any resources that can be recreated.
    }

    // MARK: - Table view data source

    override func numberOfSections(in tableView: UITableView) -> Int {
        // #warning Incomplete implementation, return the number of sections
        return 1
    }

    override func tableView(_ tableView: UITableView, numberOfRowsInSection section: Int) -> Int {
        // #warning Incomplete implementation, return the number of rows
        return objNames.count
    }

    
    override func tableView(_ tableView: UITableView, cellForRowAt indexPath: IndexPath) -> UITableViewCell {
        
        let cellIdentifier = "Cell"
        let cell = tableView.dequeueReusableCell(withIdentifier: cellIdentifier, for: indexPath)

        // Configure the cell...
        cell.textLabel?.text = objNames[indexPath.row]

        return cell
    }
    

    /*
    // Override to support conditional editing of the table view.
    override func tableView(_ tableView: UITableView, canEditRowAt indexPath: IndexPath) -> Bool {
        // Return false if you do not want the specified item to be editable.
        return true
    }
    */

    /*
    // Override to support editing the table view.
    override func tableView(_ tableView: UITableView, commit editingStyle: UITableViewCellEditingStyle, forRowAt indexPath: IndexPath) {
        if editingStyle == .delete {
            // Delete the row from the data source
            tableView.deleteRows(at: [indexPath], with: .fade)
        } else if editingStyle == .insert {
            // Create a new instance of the appropriate class, insert it into the array, and add a new row to the table view
        }    
    }
    */

    /*
    // Override to support rearranging the table view.
    override func tableView(_ tableView: UITableView, moveRowAt fromIndexPath: IndexPath, to: IndexPath) {

    }
    */

    /*
    // Override to support conditional rearranging of the table view.
    override func tableView(_ tableView: UITableView, canMoveRowAt indexPath: IndexPath) -> Bool {
        // Return false if you do not want the item to be re-orderable.
        return true
    }
    */

    /*
    // MARK: - Navigation

    // In a storyboard-based application, you will often want to do a little preparation before navigation
    override func prepare(for segue: UIStoryboardSegue, sender: Any?) {
        // Get the new view controller using segue.destinationViewController.
        // Pass the selected object to the new view controller.
    }
    */


}

7. 告知 data source 的來源


8. 若要加入 image,只要將 image 拖曳至 Access.xcassets 資料夾,然後修改下列 code:


var objNames = ["人間失格","obj2","obj3","obj4","obj5","obj6","obj7","obj8","obj9","obj10","obj11","obj12","obj13","obj14","obj15","obj16","obj17","obj18","obj19","obj20"]

override func tableView(_ tableView: UITableView, cellForRowAt indexPath: IndexPath) -> UITableViewCell {
        
        let cellIdentifier = "Cell"
        let cell = tableView.dequeueReusableCell(withIdentifier: cellIdentifier, for: indexPath)

        // Configure the cell...
        cell.textLabel?.text = objNames[indexPath.row]
        cell.imageView?.image = UIImage(named: objNames[indexPath.row])

        return cell
    }

測試

/end

練習 2: Simple Table View [Swift 3.0]


1. 新增 Single Table View Project

2. 拖曳 Table View 物件至 View Controller,並設定 Prototype Cell 的值為 1


3. 點選 Table View Cell,設定其 Identifier 的值為 Cell,Style = Basic


4. UITableView 採用 UITableViewDataSource 與 UITableViewDelegate 兩個協定 Protocol


class ViewController: UIViewController, UITableViewDelegate, UITableViewDelegate {}

6. 關於 UITableViewDataSource,我們必須實做的方法:

tableView(_:numberOfRowsInSection:)
tableView(_:cellForRowAtIndexPath:)

完整 ViewController.swift 如下:

//
//  ViewController.swift
//  MySimpleTableViewDemo
//
//  Created by Elvis Meng on 2017/3/23.
//  Copyright © 2017 Elvis Meng. All rights reserved.
//

import UIKit

var objNames = ["obj1","obj2","obj3","obj4","obj5","obj6","obj7","obj8","obj9","obj10","obj11","obj12","obj13","obj14","obj15","obj16","obj17","obj18","obj19","obj20"]

class ViewController: UIViewController, UITableViewDataSource, UITableViewDelegate {

    override func viewDidLoad() {
        super.viewDidLoad()
        // Do any additional setup after loading the view, typically from a nib.
    }

    override func didReceiveMemoryWarning() {
        super.didReceiveMemoryWarning()
        // Dispose of any resources that can be recreated.
    }

    func tableView(_ tableView: UITableView, numberOfRowsInSection section:Int) -> Int {
        return objNames.count
    }

    func tableView(_ tableView:UITableView, cellForRowAt indexPath: IndexPath) -> UITableViewCell {
        let cellIdentifier = "Cell"
        let cell = tableView.dequeueReusableCell(withIdentifier: cellIdentifier, for: indexPath)
        cell.textLabel?.text = objNames[indexPath.row]
        
        return cell
    }
}


7. 整合 UI / Code,將 UI 的 dataSource / delegate 的連接點


8. 測試

點選滑鼠右鍵,然後下拉 scroll down


若要在每個 cell 中顯示圖片 image:

1. 將圖片 image 拖曳至 Access.xcassets 目錄夾中


2. 在 Image View 屬性中,設定 Image 的值為 “英文字母“,此時這 image 加入至 Content View 中 ( 因為 Cell  的 style 為 Basic,其涵 Image View)


3. 修改 Code

import UIKit

var objNames = ["obj1","obj2","obj3","obj4","obj5","obj6","obj7","obj8","obj9","obj10","obj11","obj12","obj13","obj14","obj15","obj16","obj17","obj18","obj19","obj20"]

class ViewController: UIViewController, UITableViewDataSource, UITableViewDelegate {

    override func viewDidLoad() {
        super.viewDidLoad()
        // Do any additional setup after loading the view, typically from a nib.
    }

    override func didReceiveMemoryWarning() {
        super.didReceiveMemoryWarning()
        // Dispose of any resources that can be recreated.
    }

    func tableView(_ tableView: UITableView, numberOfRowsInSection section:Int) -> Int {
        return objNames.count
    }

    func tableView(_ tableView:UITableView, cellForRowAt indexPath: IndexPath) -> UITableViewCell {
        let cellIdentifier = "Cell"
        let cell = tableView.dequeueReusableCell(withIdentifier: cellIdentifier, for: indexPath)
        cell.textLabel?.text = objNames[indexPath.row]
        cell.imageView?.image = UIImage(named: "英文字母")
        
        return cell
    }

}


4. 測試


若想每個 Cell 正確顯示不同的 image,需更改下列 code。別忘了 objNames 中的名稱必須與 image 的命名一致。


var objNames = ["英文字母","英文字母","obj3","obj4","obj5","obj6","obj7","obj8","obj9","obj10","obj11","obj12","obj13","obj14","obj15","obj16","obj17","obj18","obj19","obj20"]

func tableView(_ tableView:UITableView, cellForRowAt indexPath: IndexPath) -> UITableViewCell {
        let cellIdentifier = "Cell"
        let cell = tableView.dequeueReusableCell(withIdentifier: cellIdentifier, for: indexPath)
        cell.textLabel?.text = objNames[indexPath.row]
        cell.imageView?.image = UIImage(named: objNames[indexPath.row])
        
        return cell
    }

測試:


/end

2017年3月23日 星期四

練習 1: Hello World! [Swift 3.0]

練習 1: Hello World! [Swift 3.0]

1. 新增 Project

Create a new Xcode project  > Single View Application (iOS)

2. Project Settings

Product Name / Team / Organization Name / Organization Identifier / (Bundle Identifier) / Language (Swift) / Devices (iPhone) / Use Core Data (none) / Include Unit Tests (none) / Include UI Tests (none)


3. Save Project Settings


4. 點選 Main.storyboard,拖曳一個 Button至 View Controller 上,更改文字為 Hello World!


5. 新增 UI / Code 連接點 @IBAction : showMessage

點選 Button,按 Control 鍵不放,拖曳至 ViewController 的 Icon 中


6. 在 Send Events 中,點選 showMessage,此時可在 Code 中 出現圓圈的連接點

7. 新增 showMessage() 的 Code

//
//  ViewController.swift
//  HelloWorldDemo
//
//  Created by Elvis Meng on 2017/3/23.
//  Copyright © 2017 Elvis Meng. All rights reserved.
//

import UIKit

class ViewController: UIViewController {

    override func viewDidLoad() {
        super.viewDidLoad()
        // Do any additional setup after loading the view, typically from a nib.
    }

    override func didReceiveMemoryWarning() {
        super.didReceiveMemoryWarning()
        // Dispose of any resources that can be recreated.
    }
    
    @IBAction func showMessage(){
     print("Hello World!")
    }


}

8.  在模擬 iPhone 中,點選 Hello World! 這Button,會顯示 Hello World ! 這字串在 Debug 視窗中


9. 若想將 Hello World ! 這字串以單獨視窗顯示,而不是顯示在 Debug 視窗

//
//  ViewController.swift
//  HelloWorldDemo
//
//  Created by Elvis Meng on 2017/3/23.
//  Copyright © 2017 Elvis Meng. All rights reserved.
//

import UIKit

class ViewController: UIViewController {

    override func viewDidLoad() {
        super.viewDidLoad()
        // Do any additional setup after loading the view, typically from a nib.
    }

    override func didReceiveMemoryWarning() {
        super.didReceiveMemoryWarning()
        // Dispose of any resources that can be recreated.
    }
    
    @IBAction func showMessage(){
     //print("Hello World!")
        let alertController = UIAlertController(title: "Alert!", message: "Hello World !", preferredStyle: UIAlertControllerStyle.alert)
        alertController.addAction(UIAlertAction(title: "OK", style: UIAlertActionStyle.default, handler: nil))
        present(alertController, animated: true, completion: nil)
    }

}


10. 測試結果:


結論:

這是很簡單練習,重點在 Xcode 開發環境熟悉,以及增加 Button 後 UI / Code 如何連接 connection。

點選 Button 後,會觸發 showMessage() 事件。  我們要實作此 code

/end

2015年10月20日 星期二

Progress Demo


1. 新增專案

2. 新增 Progress 元件
3. 為顯示結果,亦拖曳 Label
4. 新增 Button 開啟 Progress
5. Label
6. Progress
7. Button
8. 完整程式

//
//  ViewController.swift
//  ProgressDemo
//
//  Created by Elvis Meng on 2015/10/18.
//  Copyright © 2015年 Elvis Meng. All rights reserved.
//

import UIKit

class ViewController: UIViewController {
    
    var time:Float = 0.0
    var timer = NSTimer()
    
    @IBOutlet weak var showProgress: UILabel!
    @IBOutlet weak var progress: UIProgressView!
    @IBOutlet weak var buttonStatus: UIButton!
    
    override func viewDidLoad() {
        super.viewDidLoad()
        // Do any additional setup after loading the view, typically from a nib.
        progress.frame.size.width = 200
        progress.progressTintColor = UIColor.redColor()
        progress.trackTintColor = UIColor.greenColor()
        progress.progress = Float(0)
    }

    @IBAction func startProgress(sender: UIButton) {
        timer = NSTimer.scheduledTimerWithTimeInterval(0.1, 
                                                       target: self, 
                                                       selector:Selector("setProgress"),
                                                       userInfo: nil, 
                                                       repeats: true)
        buttonStatus.enabled = false
    }
    
    func setProgress() {
        time += 1.0
        progress.progress = time / 100
        showProgress.text = "\(time)%"
        if time >= 100 {
            timer.invalidate()
            buttonStatus.enabled = true
        }
    }
    
    override func didReceiveMemoryWarning() {
        super.didReceiveMemoryWarning()
        // Dispose of any resources that can be recreated.
    }
}
9. 測試
後記: Progress 這專案中,timer 的設定是關鍵,除此要知道目前現況時,就要設定類別為UIProgressView的 .progress 這屬性。 參考: 1. Progress View Tutorialin iOS8 with Swift , http://www.ioscreator.com/tutorials/progress-view-tutorial-in-ios8-with-swift 2. Swift Demo – Add Progress Bar, http://rshankar.com/swift-demo-add-progress-bar/ 3. Swift-Creating a Progress Bar, http://stackoverflow.com/questions/31432777/swift-creating-a-progress-bar

2015年10月18日 星期日

Stepper Demo


1. 新增專案

2. 尋找 UI Stepper 元件
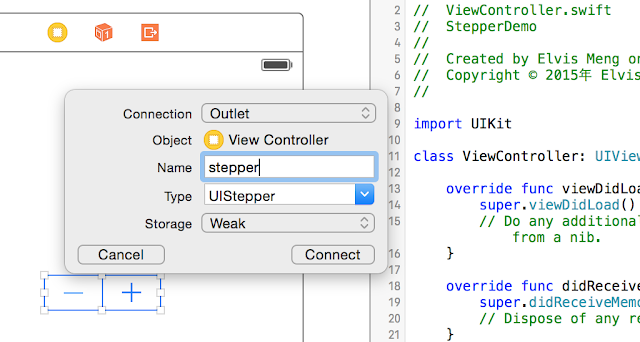
3. 連結 UI Stepper 元件至 Code
4. 新增 UI Label 顯示 Stepper 的結果
5. 製作增加 increase 事件
6. 設定 Stepper 的事件 Action
7. 完整程式

//
//  ViewController.swift
//  StepperDemo
//
//  Created by Elvis Meng on 2015/10/18.
//  Copyright © 2015年 Elvis Meng. All rights reserved.
//

import UIKit

class ViewController: UIViewController {

    @IBOutlet weak var stepper: UIStepper!
    @IBOutlet weak var showStepper: UILabel!
    
    override func viewDidLoad() {
        super.viewDidLoad()
        // Do any additional setup after loading the view, typically from a nib.
        stepper.minimumValue = 0
        stepper.maximumValue = 10
        stepper.stepValue = 1
        stepper.value = 0
        
        showStepper.text = "Your value :" + String(stepper.value)
    }

    @IBAction func stepperClick(sender: UIStepper) {
        showStepper.text = "Your value :" + String(stepper.value)
    }

    override func didReceiveMemoryWarning() {
        super.didReceiveMemoryWarning()
        // Dispose of any resources that can be recreated.
    }
}
8. 測試
後記: UI Stepper 這元件有 + 與 - 這 2 個方向,剛開始會以為需要設定 2 個 Action,一個處理正向 + 增加值,另一個處理負向 - 減少值。事實上只要新增一個 click action 即可,正負向由此元件來控制。 UI Stepper 這元件尺寸大小是固定,不能變更。 參考: 1. Stepper, https://developer.apple.com/library/prerelease/ios/documentation/UserExperience/Conceptual/UIKitUICatalog/Stepper.html 2. UI Stepper Class, https://developer.apple.com/library/prerelease/ios/documentation/UIKit/Reference/UIStepper_Class/ 3. String Format Specifiers, https://developer.apple.com/library/prerelease/ios/documentation/Cocoa/Conceptual/Strings/Articles/formatSpecifiers.html

DatePicker Demo


日期與時間的設定常被用到。Apple 以類似賭場拉霸的滾筒式方式來設定日期與時間。在設定日期與時間前,我們要先決定好:

1. 模式 Mode: 是只設定日期或時間,或是兩者都要?
2. 時區 Locale: 這日期時間的時區是台北時間?還是其他地方的時區?
3. 滾筒的可選的日期/時間間隔 Interval
4. 最後日期 / 時間該如何呈現?

1. 新增專案

2. 拖曳一個 DatePicker 元件
3. 此時,Apple 已幫我們設定好 Default 值
4. 將 UI 中的 DataPiker 元件與 Code 連結
5. 為顯示設定日期/時間結果,新增 Label
6. 連結後的 Code
7. 新增當 DataPicker 的設定更改時,被啟發的事件 event
8. 設定此事件 event 為 dateUpdate
9. 完整程式

//
//  ViewController.swift
//  DatePickerDemo
//
//  Created by Elvis Meng on 2015/10/18.
//  Copyright © 2015年 Elvis Meng. All rights reserved.
//

import UIKit

class ViewController: UIViewController {
    
    var dateFormatter = NSDateFormatter()

    @IBOutlet weak var datePicker: UIDatePicker!
    @IBOutlet weak var showDatePicker: UILabel!
    
    override func viewDidLoad() {
        super.viewDidLoad()
        // Do any additional setup after loading the view, typically from a nib.
        
        datePicker.datePickerMode = UIDatePickerMode.DateAndTime
        datePicker.locale = NSLocale(localeIdentifier: "zh_TW")
        datePicker.date = NSDate()
        
        dateFormatter.dateFormat = "西元 y 年 M 月 d 日 hh 點 mm 分 ss 秒"
        showDatePicker.text = dateFormatter.stringFromDate(datePicker.date)
    }

    @IBAction func dateUpdate(sender: UIDatePicker) {
        showDatePicker.text = dateFormatter.stringFromDate(datePicker.date)
    }
    
    override func didReceiveMemoryWarning() {
        super.didReceiveMemoryWarning()
        // Dispose of any resources that can be recreated.
    }
}
10. 測試
後記 日期 / 時間呈現時,顯示格式的設定很重要。例如:在這 demo 中以 var dateFormatter = NSDateFormatter() 宣告一個 dataFormatter 變數,而以 dateFormatter.dateFormat = "西元 y 年 M 月 d 日 hh 點 mm 分 ss 秒" 來設定。這裡更改 DatePicker 日期 / 時間並不會顯示,程式要另外修改屬性。 參考: 1. Date Picker, https://developer.apple.com/library/prerelease/ios/documentation/UserExperience/Conceptual/UIKitUICatalog/DatePicker.html 2. NSDate, https://developer.apple.com/library/prerelease/ios/documentation/Cocoa/Reference/Foundation/Classes/NSDate_Class/ 3. DatePicker, https://developer.apple.com/library/prerelease/mac/samplecode/DatePicker/Introduction/Intro.html 4. NSDateFormatter, https://developer.apple.com/library/prerelease/ios/documentation/Cocoa/Reference/Foundation/Classes/NSDateFormatter_Class/
prettyPrint();