Problem
以 removeAtIndex 刪除 Array 中一個 Element,出現下列錯誤:

Solution
Swift 3 不支援 removeAtIndex 刪除 Array 中的一個 Element,而改用:


1. 新增專案2. 新增 Progress 元件3. 為顯示結果,亦拖曳 Label4. 新增 Button 開啟 Progress5. Label6. Progress7. Button8. 完整程式// // ViewController.swift // ProgressDemo // // Created by Elvis Meng on 2015/10/18. // Copyright © 2015年 Elvis Meng. All rights reserved. // import UIKit class ViewController: UIViewController { var time:Float = 0.0 var timer = NSTimer() @IBOutlet weak var showProgress: UILabel! @IBOutlet weak var progress: UIProgressView! @IBOutlet weak var buttonStatus: UIButton! override func viewDidLoad() { super.viewDidLoad() // Do any additional setup after loading the view, typically from a nib. progress.frame.size.width = 200 progress.progressTintColor = UIColor.redColor() progress.trackTintColor = UIColor.greenColor() progress.progress = Float(0) } @IBAction func startProgress(sender: UIButton) { timer = NSTimer.scheduledTimerWithTimeInterval(0.1, target: self, selector:Selector("setProgress"), userInfo: nil, repeats: true) buttonStatus.enabled = false } func setProgress() { time += 1.0 progress.progress = time / 100 showProgress.text = "\(time)%" if time >= 100 { timer.invalidate() buttonStatus.enabled = true } } override func didReceiveMemoryWarning() { super.didReceiveMemoryWarning() // Dispose of any resources that can be recreated. } }9. 測試後記: Progress 這專案中,timer 的設定是關鍵,除此要知道目前現況時,就要設定類別為UIProgressView的 .progress 這屬性。 參考: 1. Progress View Tutorialin iOS8 with Swift , http://www.ioscreator.com/tutorials/progress-view-tutorial-in-ios8-with-swift 2. Swift Demo – Add Progress Bar, http://rshankar.com/swift-demo-add-progress-bar/ 3. Swift-Creating a Progress Bar, http://stackoverflow.com/questions/31432777/swift-creating-a-progress-bar
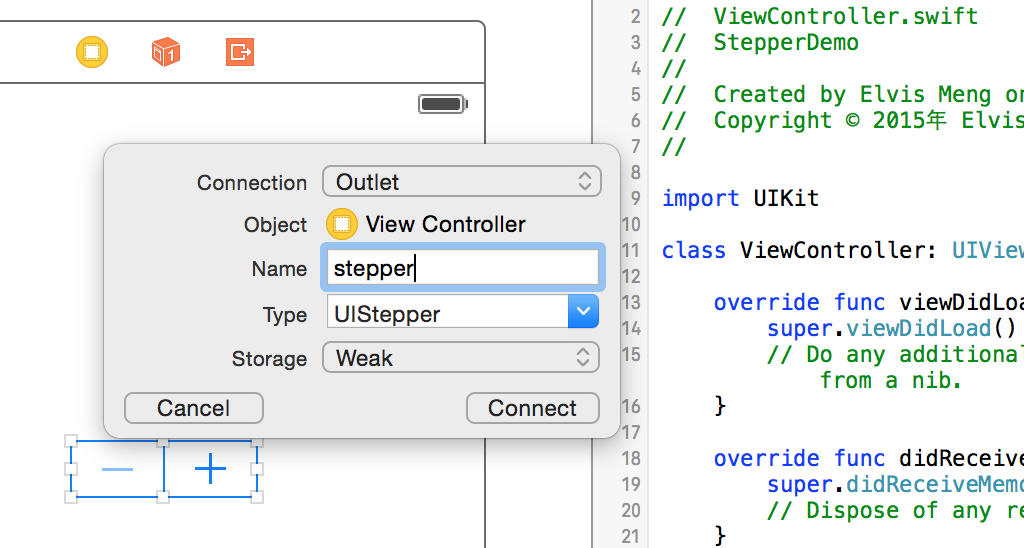
1. 新增專案2. 尋找 UI Stepper 元件3. 連結 UI Stepper 元件至 Code4. 新增 UI Label 顯示 Stepper 的結果5. 製作增加 increase 事件6. 設定 Stepper 的事件 Action7. 完整程式// // ViewController.swift // StepperDemo // // Created by Elvis Meng on 2015/10/18. // Copyright © 2015年 Elvis Meng. All rights reserved. // import UIKit class ViewController: UIViewController { @IBOutlet weak var stepper: UIStepper! @IBOutlet weak var showStepper: UILabel! override func viewDidLoad() { super.viewDidLoad() // Do any additional setup after loading the view, typically from a nib. stepper.minimumValue = 0 stepper.maximumValue = 10 stepper.stepValue = 1 stepper.value = 0 showStepper.text = "Your value :" + String(stepper.value) } @IBAction func stepperClick(sender: UIStepper) { showStepper.text = "Your value :" + String(stepper.value) } override func didReceiveMemoryWarning() { super.didReceiveMemoryWarning() // Dispose of any resources that can be recreated. } }8. 測試後記: UI Stepper 這元件有 + 與 - 這 2 個方向,剛開始會以為需要設定 2 個 Action,一個處理正向 + 增加值,另一個處理負向 - 減少值。事實上只要新增一個 click action 即可,正負向由此元件來控制。 UI Stepper 這元件尺寸大小是固定,不能變更。 參考: 1. Stepper, https://developer.apple.com/library/prerelease/ios/documentation/UserExperience/Conceptual/UIKitUICatalog/Stepper.html 2. UI Stepper Class, https://developer.apple.com/library/prerelease/ios/documentation/UIKit/Reference/UIStepper_Class/ 3. String Format Specifiers, https://developer.apple.com/library/prerelease/ios/documentation/Cocoa/Conceptual/Strings/Articles/formatSpecifiers.html