Purpose: 探討如何以 Swift 建立新的檔案。 Code:// // ViewController.swift // FileBuildUpDemo // // Created by Elvis Meng on 2015/9/28. // Copyright © 2015年 Elvis Meng. All rights reserved. // import UIKit class ViewController: UIViewController { override func viewDidLoad() { super.viewDidLoad() // Do any additional setup after loading the view, typically from a nib. let fileManager = NSFileManager.defaultManager() let directory = NSHomeDirectory().stringByAppendingString("Documents/data") do { try fileManager.createDirectoryAtPath(directory, withIntermediateDirectories: true, attributes: nil) print("directory build up success") } catch { print("directory build up fail") } } override func didReceiveMemoryWarning() { super.didReceiveMemoryWarning() // Dispose of any resources that can be recreated. } }Test:當 fileManager.createDirectoryAtPath(:directory, withIntermediateDirectories:, attributes:) 的 withIntermediateDirectories 設為 false 時,若此檔案已建立,則不覆蓋原有檔案:後記: 新版本 Xcode 7.0 只支援 fileManager.createDirectoryAtPath(:directory, withIntermediateDirectories:, attributes:),不支援 fileManager.createDirectoryAtPath(:directory, withIntermediateDirectories:, attributes:, error:),且呼叫改採用 throws 方式來呼叫,即程式要用 do { try func XXX } catch { ... } 的語法。 參考: 1.NSFileManager, https://developer.apple.com/library/prerelease/watchos/documentation/Cocoa/Reference/Foundation/Classes/NSFileManager_Class/
2015年9月28日 星期一
新增檔案 Create a New File


2015年9月25日 星期五
專案中的 Bundle ID
開發 App 時會啟動一個專案 Project,而除了專案的名稱之外,我們還要給這專案一個很特別的 Bundle ID。此 Bundle ID 是由 Product Name 與 Domain Name 組成。為何需要此 Bundle ID 呢? 因上架到 App Store 的應用 App 相當多,而 Apple 設計要求每個 App 要有自己的 Bundle ID,而此 Bundle ID 在 App Store 是唯一的,就像是我們的身分證一樣。 當 User 下載安裝你的 App,安裝後會在其 iPhone / iPad 上建立一個專屬的目錄,用來存放你的 App 執行檔,圖片,音樂等,同時存放資料。別人的 App 無法存取你專屬目錄下的資料,這是 Apple 以 Sandbox 概念,來管理資料的安全性。 App 安裝後,每個 App 也會有自己的目錄結構,每個目錄各自放不同的資料方便管理。Apple 在資料的管理上採用 Container 概念,即每一個 Container 各司其既定的功能。 例如: Bundle Container。在這 Container 下,存放我們在 Xcode 所開發的 Code,Resource,與相關 Supporting Files。參考: 1. File System Basics, https://developer.apple.com/library/prerelease/ios/documentation/FileManagement/Conceptual/FileSystemProgrammingGuide/FileSystemOverview/FileSystemOverview.html#//apple_ref/doc/uid/TP40010672-CH2-SW2


2015年9月23日 星期三
取得目前定位的位置
CLLocationManager 直接繼承 NSObject,在程式中要用 import CoreLocation 取得其相關工具 (元件)CLLocationManager 的使用方式如下:生成 CLLocationManager 這物件,並指定其代理 delegate:locationManager = CLLocationManager() locationManager.delegate = self與 Core Location 這類別相關的常數 Constant:所以,我們在此只設定取到位置需要的精準度:locationManager.desireAccuracy = kCLLocatinAccruacyBest取得使用 Core Location 授權:在此選用 requestAlwaysAuthorization() 方法:locationManager.requestAlwaysAuthorization()如何取得目前的座標位置?新增專案:程式碼:// // ViewController.swift // FindLocationDemo // // Created by Elvis Meng on 2015/9/23. // Copyright © 2015年 Elvis Meng. All rights reserved. // import UIKit import CoreLocation class ViewController: UIViewController, CLLocationManagerDelegate{ var locationManager: CLLocationManager! override func viewDidLoad() { super.viewDidLoad() // Do any additional setup after loading the view, typically from a nib. locationManager = CLLocationManager() locationManager.delegate = self locationManager.desiredAccuracy = kCLLocationAccuracyBest locationManager.requestAlwaysAuthorization() locationManager.startUpdatingLocation() //locationManager.startUpdatingHeading() } override func didReceiveMemoryWarning() { super.didReceiveMemoryWarning() // Dispose of any resources that can be recreated. } func locationManager(manager: CLLocationManager, didUpdateLocations locations: [CLLocation]) { let curLocation:CLLocation = locations[0] print("test") print("latitude = \(curLocation.coordinate.latitude)") print("longitude = \(curLocation.coordinate.longitude)") } override func viewDidDisappear(animated: Bool) { locationManager.stopUpdatingLocation() } }測試環境設定:新增 2 個環境變數:開始測試: 允許定位:此時新增 Privacy檢查 Location Service 是否開啟 ON:設定 Apple 已預設城市座標,選擇 Tokyo, Japan:測試結果:參考: 1. CLLocationManager, https://developer.apple.com/library/prerelease/watchos/documentation/CoreLocation/Reference/CLLocationManager_Class/index.html#//apple_ref/occ/cl/CLLocationManager 2. Core Location and Map Kit: Bringing Your Own Maps [Voices That Matter: iPhone 2010], http://www.slideshare.net/invalidname/adamson-bringingyourownmaps 3. Reduce Location Accuracy and Duration, https://developer.apple.com/library/prerelease/ios/documentation/Performance/Conceptual/EnergyGuide-iOS/LocationBestPractices.html 4. CLHeading, https://developer.apple.com/library/ios/documentation/CoreLocation/Reference/CLHeading_Class/ 5. About Location Services and Maps, https://developer.apple.com/library/ios/documentation/UserExperience/Conceptual/LocationAwarenessPG/Introduction/Introduction.html 6. Getting the User’s Location, https://developer.apple.com/library/ios/documentation/UserExperience/Conceptual/LocationAwarenessPG/CoreLocation/CoreLocation.html#//apple_ref/doc/uid/TP40009497-CH2-SW1 7. Core Location Constants Reference, https://developer.apple.com/library/prerelease/tvos/documentation/CoreLocation/Reference/CoreLocationConstantsRef/ 8. CLLocationManagerDelegate, https://developer.apple.com/library/prerelease/watchos/documentation/CoreLocation/Reference/CLLocationManagerDelegate_Protocol/index.html#//apple_ref/occ/intf/CLLocationManagerDelegate


2015年9月21日 星期一
Random Generator 亂數產生器
在 Apple 的官方網站 [1]上描述 arc4random_uniform() 這亂數產生器:u_int32_t arc4random_uniform(u_int32_t upper_bound); arc4random_uniform() will return a uniformly distributed random number less than upper_bound. arc4random_uniform() is recommended over constructions like ``arc4random() % upper_bound'' as it avoids "modulo bias" when the upper bound is not a power of two.程式:// // ViewController.swift // RandomGeneratorDemo // // Created by Elvis Meng on 2015/9/21. // Copyright © 2015年 Elvis Meng. All rights reserved. // import UIKit class ViewController: UIViewController { override func viewDidLoad() { super.viewDidLoad() // Do any additional setup after loading the view, typically from a nib. let n:UInt32 = UInt32(arc4random_uniform(100)+1) print("n = \(n)") } override func didReceiveMemoryWarning() { super.didReceiveMemoryWarning() // Dispose of any resources that can be recreated. } }測試:參考: 1. ARC4RANDOM(3), https://developer.apple.com/library/prerelease/mac/documentation/Darwin/Reference/ManPages/man3/arc4random_uniform.3.html

查看手機目前使用狀態
查看手機名稱,iOS 版本,型號等資訊:亦可查看手機目前電池使用狀況:而電池的使用狀態由此得知:目前系統提供下列電池的狀態:App 建立步驟: 1. 新增 Single View App// // ViewController.swift // DeviceStatus // // Created by Elvis Meng on 2015/9/16. // Copyright (c) 2015年 Elvis Meng. All rights reserved. // import UIKit class ViewController: UIViewController { override func viewDidLoad() { super.viewDidLoad() // Do any additional setup after loading the view, typically from a nib. UIDevice.currentDevice().batteryMonitoringEnabled = true println("Model Name: \(UIDevice.currentDevice().model)") println("Batery Open? \(UIDevice.currentDevice().batteryMonitoringEnabled)") println("Battery Level: \(UIDevice.currentDevice().batteryLevel)") println("Battery State: \(UIDevice.currentDevice().batteryState.hashValue)") } override func didReceiveMemoryWarning() { super.didReceiveMemoryWarning() // Dispose of any resources that can be recreated. } }測試:後記: 注意到沒?為何 iDevice 註冊後,設定 .batteryMonitoringEnabled = true,但 Batery Open? 的值仍為 false。這是 Bug? 我懷疑也相信。 參考: 1. UIDevice, https://developer.apple.com/library/prerelease/ios/documentation/UIKit/Reference/UIDevice_Class/ 2. iOS SDK详解之UIDevice(系统版本,设备型号...), http://blog.csdn.net/Hello_Hwc/article/details/46326571


2015年9月15日 星期二
類別間函數 Function 的呼叫
Purpose: 函數 Function 定義在 A 類別,而由 B 類別呼叫使用 Step: 1. 新增 Single View App2. 在 AppDelegate.swift 實作新函數:myFun()// AppDelegate.swift // CallFunctionOutside // // Created by Elvis Meng on 2015/9/15. // Copyright (c) 2015年 Elvis Meng. All rights reserved. // import UIKit @UIApplicationMain class AppDelegate: UIResponder, UIApplicationDelegate { var window: UIWindow? func myFun(#name:String, sex:String)->() { println("name: \(name), sex: \(sex)") }3. 在 ViewController.swift 中實作,呼叫被定義在 AppDelegate.swift 中的新函數 myFun()// // ViewController.swift // CallFunctionOutside // // Created by Elvis Meng on 2015/9/15. // Copyright (c) 2015年 Elvis Meng. All rights reserved. // import UIKit class ViewController: UIViewController { override func viewDidLoad() { super.viewDidLoad() // Do any additional setup after loading the view, typically from a nib. var vcApp = UIApplication.sharedApplication().delegate as! AppDelegate vcApp.myFun(name: "Evis Meng", sex: "Male") } override func didReceiveMemoryWarning() { super.didReceiveMemoryWarning() // Dispose of any resources that can be recreated. } }在此我們呼叫方法 .shareApplication 去獲得 app instance:此時,呼叫這方法後,其返回值然為 UIApplication,這時呼叫其屬性 delegate經過資料類別強制轉換成 AppDelegate 後,再接下來就是測試驗證了。 4. 驗證參考: 1. UIApplication, https://developer.apple.com/library/prerelease/ios/documentation/UIKit/Reference/UIApplication_Class/


第 7 個程式:導覽控制器 Navigator 與 Segue
1. 加入 Navigation Controller,以 Seque = Push 來連接 Navigation Controller 與 Table View Controller. 首先,點選 Table View Controller,然後點選 Editor > Embed In > Navigation Controller:3. Implement Navigation, https://developer.apple.com/library/prerelease/ios/referencelibrary/GettingStarted/DevelopiOSAppsSwift/Lesson8.html這時 Navigation Controller 被自動設定為 Initial View Controller,且連結 Table View Controller。 2. 加入 View Controller 這 UI,以 Segue = Push 來連接 Table View Controller (Source) 與 View Controller (Destination) 先新增 View Controller,之後在 Table View Controller 選取 Cell,然後按下 Control 鍵不放,拖曳至新的 View Controller 上,此時設定 Segue = Push:點選後,新的 Segue 連接了 Table View Controller 與 View Controller:3. 在這新的 View Controller 的 Destination View Controller 上,新增 Lable 以顯示 Table View 被選取後的資料接著給這新的 Segue 一個 ID:在這之前,我們整個 UI 算是完成,接下來我們要控制這些 UI 元件。 4. 然後新增此 UI 物件的類別,將此類別 Assign 到此 UI (即這 UI 與這 Class 關聯) 新增 View Controller 類別:然後新增此 UI 物件的類別,將此類別 Assign 到此 UI (即這 UI 與這 Class 關聯) 然後,將此類別 Assign 到此 UI :5. 實作點選 Source Controller 上的 Cell後,在 Destination Controller 能顯示此資料: 點選 Destination Controller 上的 Label,並按 Control 鍵不放,拖曳至 Code 中:Detail View Controller 的程式修改如下:接下來處理 Table View 資料選取後,傳遞到 View Controller 再處理,傳遞方式是 Source View Controller 會呼叫 prepareForSegue 這方法:6. 在 Source View Controller 實作 prepareForSegue,當選取資料時,資料能傳遞到 Destination Controller測試: Run 後顯示的 UI:點選第一行資料 book,測試是否資料會傳遞到下一個 UI 畫面:程式碼: Table View Controller:// // MyTableViewController.swift // SimpleTableViewControllerDemo // // Created by Elvis Meng on 2015/9/6. // Copyright (c) 2015年 Elvis Meng. All rights reserved. // import UIKit class MyTableViewController: UITableViewController, UITableViewDataSource, UITableViewDelegate { var vocabulary = ["book","pen","queen","1","2","3","4","5","6","7","8","9","10","11","12","13","14","15"] override func viewDidLoad() { super.viewDidLoad() // Uncomment the following line to preserve selection between presentations // self.clearsSelectionOnViewWillAppear = false // Uncomment the following line to display an Edit button in the navigation bar for this view controller. // self.navigationItem.rightBarButtonItem = self.editButtonItem() } override func didReceiveMemoryWarning() { super.didReceiveMemoryWarning() // Dispose of any resources that can be recreated. } // MARK: - Table view data source override func numberOfSectionsInTableView(tableView: UITableView) -> Int { // #warning Potentially incomplete method implementation. // Return the number of sections. return 1 } override func tableView(tableView: UITableView, numberOfRowsInSection section: Int) -> Int { // #warning Incomplete method implementation. // Return the number of rows in the section. return self.vocabulary.count } override func tableView(tableView: UITableView, cellForRowAtIndexPath indexPath: NSIndexPath) -> UITableViewCell { let cellIdentifier = "Cell" let cell = tableView.dequeueReusableCellWithIdentifier(cellIdentifier, forIndexPath: indexPath) as! UITableViewCell // Configure the cell... cell.textLabel?.text = vocabulary[indexPath.row] return cell } override func tableView(tableView: UITableView, didSelectRowAtIndexPath indexPath: NSIndexPath) { let cell: UITableViewCell = tableView.cellForRowAtIndexPath(indexPath)! if cell.accessoryType == UITableViewCellAccessoryType.None { cell.accessoryType = UITableViewCellAccessoryType.Checkmark } else { cell.accessoryType = UITableViewCellAccessoryType.None } tableView.deselectRowAtIndexPath(indexPath, animated: true) } override func tableView(tableView: UITableView, didDeselectRowAtIndexPath indexPath: NSIndexPath) { let cell: UITableViewCell = tableView.cellForRowAtIndexPath(indexPath)! if cell.accessoryType == UITableViewCellAccessoryType.None { cell.accessoryType = UITableViewCellAccessoryType.Checkmark } else { cell.accessoryType = UITableViewCellAccessoryType.None } tableView.deselectRowAtIndexPath(indexPath, animated: false) } override func tableView(tableView: UITableView, commitEditingStyle editingStyle: UITableViewCellEditingStyle, forRowAtIndexPath indexPath: NSIndexPath) { if editingStyle == .Delete { self.vocabulary.removeAtIndex(indexPath.row) //tableView.deleteRowsAtIndexPaths([indexPath], withRowAnimation: .Fade) self.tableView.reloadData() } else if editingStyle == .Insert { self.vocabulary.insert("new", atIndex: indexPath.row) self.tableView.reloadData() } } override func tableView(tableView: UITableView, editActionsForRowAtIndexPath indexPath: NSIndexPath) -> [AnyObject]? { var deleteAction = UITableViewRowAction(style: UITableViewRowActionStyle.Default, title: "Delete", handler: {(action:UITableViewRowAction!, indexPath: NSIndexPath!) -> Void in self.vocabulary.removeAtIndex(indexPath.row) self.tableView.reloadData() } ) let alertAction = UITableViewRowAction(style : UITableViewRowActionStyle.Default,title : "Share", handler : {(action:UITableViewRowAction!, indexPath: NSIndexPath!) -> Void in let alertController = UIAlertController(title:"My First App", message:"Hello World", preferredStyle: .Alert) let alertAction = UIAlertAction(title:"OK", style: UIAlertActionStyle.Default, handler:nil) alertController.addAction(alertAction) self.presentViewController(alertController, animated: true, completion: nil) } ) return [deleteAction, alertAction] } /* // Override to support editing the table view. override func tableView(tableView: UITableView, commitEditingStyle editingStyle: UITableViewCellEditingStyle, forRowAtIndexPath indexPath: NSIndexPath) { if editingStyle == .Delete { // Delete the row from the data source tableView.deleteRowsAtIndexPaths([indexPath], withRowAnimation: .Fade) } else if editingStyle == .Insert { // Create a new instance of the appropriate class, insert it into the array, and add a new row to the table view } } */ /* // Override to support rearranging the table view. override func tableView(tableView: UITableView, moveRowAtIndexPath fromIndexPath: NSIndexPath, toIndexPath: NSIndexPath) { } */ /* // Override to support conditional rearranging of the table view. override func tableView(tableView: UITableView, canMoveRowAtIndexPath indexPath: NSIndexPath) -> Bool { // Return NO if you do not want the item to be re-orderable. return true } */ // MARK: - Navigation // In a storyboard-based application, you will often want to do a little preparation before navigation override func prepareForSegue(segue: UIStoryboardSegue, sender: AnyObject?) { // Get the new view controller using [segue destinationViewController]. // Pass the selected object to the new view controller. if segue.identifier == "detailSegue" { let indexPath = self.tableView.indexPathForSelectedRow() var destinationController = segue.destinationViewController as! DetailViewController destinationController.senderText = self.vocabulary[indexPath!.row] } } }Detail View Controller:// // DetailViewController.swift // SimpleTableViewControllerDemo // // Created by Elvis Meng on 2015/9/12. // Copyright (c) 2015年 Elvis Meng. All rights reserved. // import UIKit class DetailViewController: UIViewController { @IBOutlet var word: UILabel! var senderText:String! override func viewDidLoad() { super.viewDidLoad() // Do any additional setup after loading the view. self.word.text = senderText } override func didReceiveMemoryWarning() { super.didReceiveMemoryWarning() // Dispose of any resources that can be recreated. } /* // MARK: - Navigation // In a storyboard-based application, you will often want to do a little preparation before navigation override func prepareForSegue(segue: UIStoryboardSegue, sender: AnyObject?) { // Get the new view controller using segue.destinationViewController. // Pass the selected object to the new view controller. } */ }參考: 1. Segue Compatibility, https://developer.apple.com/library/prerelease/ios/recipes/xcode_help-IB_storyboard/Chapters/BackwardCompatibilityofActiveSegues.html 2. UIViewController,https://developer.apple.com/library/prerelease/tvos/documentation/UIKit/Reference/UIViewController_Class/


為何點選 Embed In 後,Navigation Controller 反白?
Problem: 要在 Table View Controller 前加一個 Navigation Controller,但想以 Editor > Embed In 加入時,發現功能反白,無法加入。Solution: 你必須先點選 Table View Controller 這個 UI 畫面,然後再點選 Editor > Embed In > Navigation Controller:Test: 注意:此新加入的 Navigation Controller 被自動設定為 Initial View Controller。


2015年9月10日 星期四
第 6 個程式:Cell 上多重功能的製作: UITableViewRowAction
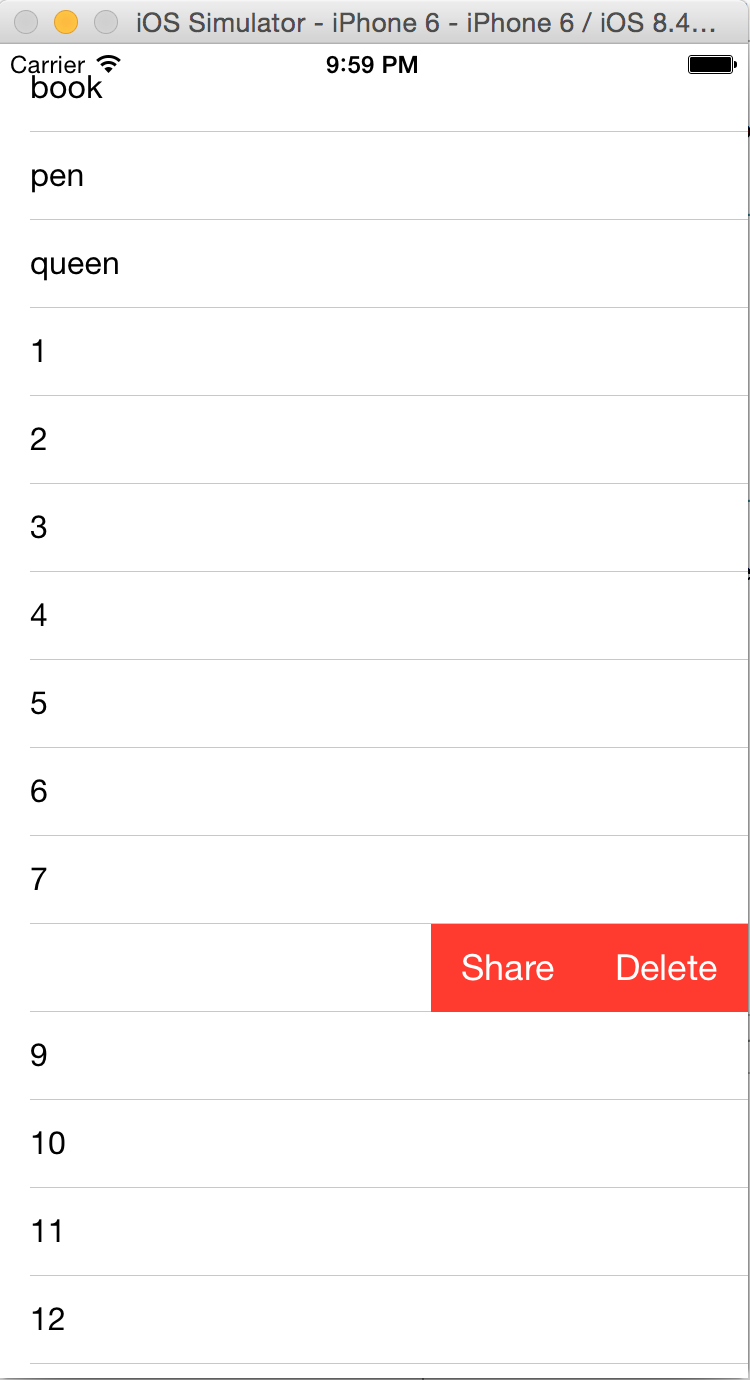
在 Cell 上我們可客製化 Cell,讓它除了 Delete 這功能外,還有其他功能可選。如何做? 我們要把新的功能 Action 加入 UITableViewRowAction 中。這函數 tableView(_:editActionsForRowAtIndexPath:) (New in tvos 9.0) 被定義在 UITableViewDelegate 這協定中:也就是說我們要實作此協定:override func tableView(_ tableView: UITableView, editActionsForRowAtIndexPath indexPath: NSIndexPath) -> [UITableViewRowAction]? { }但,在此協定中我們又該如何把新的 Action 加入?我們依文件說明,來加入 Action:override func tableView(tableView: UITableView, editActionsForRowAtIndexPath indexPath: NSIndexPath) -> [AnyObject]? { var deleteAction = UITableViewRowAction(style: UITableViewRowActionStyle.Default, title: "Delete", handler: {(action:UITableViewRowAction!, indexPath: NSIndexPath!) -> Void in self.vocabulary.removeAtIndex(indexPath.row) self.tableView.reloadData() } ) let alertAction = UITableViewRowAction(style : UITableViewRowActionStyle.Default, title : "Share", handler : {(action:UITableViewRowAction!, indexPath: NSIndexPath!) -> Void in let alertController = UIAlertController(title:"My First App", message:"Hello World", preferredStyle: .Alert) let alertAction = UIAlertAction(title:"OK", style: UIAlertActionStyle.Default, handler:nil) alertController.addAction(alertAction) self.presentViewController(alertController, animated: true, completion: nil) } ) return [deleteAction, alertAction] }呼! 寫到此,驗證結果: 1. 選取 Cell,然後向左滑,顯示 Share 與 Delete Button2. 按下 Share 按鈕3. 在 Cell 顯示 8 的行,按下 Delete 按鈕程式碼:// // MyTableViewController.swift // SimpleTableViewControllerDemo // // Created by Elvis Meng on 2015/9/6. // Copyright (c) 2015年 Elvis Meng. All rights reserved. // import UIKit class MyTableViewController: UITableViewController, UITableViewDataSource, UITableViewDelegate { var vocabulary = ["book","pen","queen","1","2","3","4","5","6","7","8","9","10","11","12","13","14","15"] override func viewDidLoad() { super.viewDidLoad() // Uncomment the following line to preserve selection between presentations // self.clearsSelectionOnViewWillAppear = false // Uncomment the following line to display an Edit button in the navigation bar for this view controller. // self.navigationItem.rightBarButtonItem = self.editButtonItem() } override func didReceiveMemoryWarning() { super.didReceiveMemoryWarning() // Dispose of any resources that can be recreated. } // MARK: - Table view data source override func numberOfSectionsInTableView(tableView: UITableView) -> Int { // #warning Potentially incomplete method implementation. // Return the number of sections. return 1 } override func tableView(tableView: UITableView, numberOfRowsInSection section: Int) -> Int { // #warning Incomplete method implementation. // Return the number of rows in the section. return self.vocabulary.count } override func tableView(tableView: UITableView, cellForRowAtIndexPath indexPath: NSIndexPath) -> UITableViewCell { let cellIdentifier = "Cell" let cell = tableView.dequeueReusableCellWithIdentifier(cellIdentifier, forIndexPath: indexPath) as! UITableViewCell // Configure the cell... cell.textLabel?.text = vocabulary[indexPath.row] return cell } override func tableView(tableView: UITableView, didSelectRowAtIndexPath indexPath: NSIndexPath) { let cell: UITableViewCell = tableView.cellForRowAtIndexPath(indexPath)! if cell.accessoryType == UITableViewCellAccessoryType.None { cell.accessoryType = UITableViewCellAccessoryType.Checkmark } else { cell.accessoryType = UITableViewCellAccessoryType.None } tableView.deselectRowAtIndexPath(indexPath, animated: true) } override func tableView(tableView: UITableView, didDeselectRowAtIndexPath indexPath: NSIndexPath) { let cell: UITableViewCell = tableView.cellForRowAtIndexPath(indexPath)! if cell.accessoryType == UITableViewCellAccessoryType.None { cell.accessoryType = UITableViewCellAccessoryType.Checkmark } else { cell.accessoryType = UITableViewCellAccessoryType.None } tableView.deselectRowAtIndexPath(indexPath, animated: false) } override func tableView(tableView: UITableView, commitEditingStyle editingStyle: UITableViewCellEditingStyle, forRowAtIndexPath indexPath: NSIndexPath) { if editingStyle == .Delete { self.vocabulary.removeAtIndex(indexPath.row) //tableView.deleteRowsAtIndexPaths([indexPath], withRowAnimation: .Fade) self.tableView.reloadData() } else if editingStyle == .Insert { self.vocabulary.insert("new", atIndex: indexPath.row) self.tableView.reloadData() } } override func tableView(tableView: UITableView, editActionsForRowAtIndexPath indexPath: NSIndexPath) -> [AnyObject]? { var deleteAction = UITableViewRowAction(style: UITableViewRowActionStyle.Default, title: "Delete", handler: {(action:UITableViewRowAction!, indexPath: NSIndexPath!) -> Void in self.vocabulary.removeAtIndex(indexPath.row) self.tableView.reloadData() } ) let alertAction = UITableViewRowAction(style : UITableViewRowActionStyle.Default,title : "Share", handler : {(action:UITableViewRowAction!, indexPath: NSIndexPath!) -> Void in let alertController = UIAlertController(title:"My First App", message:"Hello World", preferredStyle: .Alert) let alertAction = UIAlertAction(title:"OK", style: UIAlertActionStyle.Default, handler:nil) alertController.addAction(alertAction) self.presentViewController(alertController, animated: true, completion: nil) } ) return [deleteAction, alertAction] } /* // Override to support editing the table view. override func tableView(tableView: UITableView, commitEditingStyle editingStyle: UITableViewCellEditingStyle, forRowAtIndexPath indexPath: NSIndexPath) { if editingStyle == .Delete { // Delete the row from the data source tableView.deleteRowsAtIndexPaths([indexPath], withRowAnimation: .Fade) } else if editingStyle == .Insert { // Create a new instance of the appropriate class, insert it into the array, and add a new row to the table view } } */ /* // Override to support rearranging the table view. override func tableView(tableView: UITableView, moveRowAtIndexPath fromIndexPath: NSIndexPath, toIndexPath: NSIndexPath) { } */ /* // Override to support conditional rearranging of the table view. override func tableView(tableView: UITableView, canMoveRowAtIndexPath indexPath: NSIndexPath) -> Bool { // Return NO if you do not want the item to be re-orderable. return true } */ /* // MARK: - Navigation // In a storyboard-based application, you will often want to do a little preparation before navigation override func prepareForSegue(segue: UIStoryboardSegue, sender: AnyObject?) { // Get the new view controller using [segue destinationViewController]. // Pass the selected object to the new view controller. } */ }參考: 1.UITableViewRowAction, https://developer.apple.com/library/prerelease/tvos/documentation/UIKit/Reference/UITableViewRowAction_class/


訂閱:
意見 (Atom)